Installing Nextcloud on a Synology NAS system
Since my Android of choice “CalyxOS” comes with a neat little backup utility called “Seedvault” which will create encrypted backups to Nextcloud I of course wanted to check this out. As I’m already using Déjà-Dup to store backups of my Linux workstation to a Synology NAS drive I looked into the procedure of installing Nextcloud. Fortunately I found some great howtos which I heavily relied on. So thanks to https://strobelstefan.org/2021/03/19/nextcloud-auf-einem-synology-nas-installieren/ and https://mariushosting.com/how-to-install-nextcloud-on-your-synology-nas/ for writing those guides and what you find here will basically repeat their descriptions - maybe with a few alterations.
Two remarks though:
- your Synology NAS should have a sufficient amount of memory and maybe at least a little CPU power (mine is a DS220+ with 2GB RAM/Intel Celeron CPU and Nextcloud is working fine)
- for security reasons I would NOT expose this setup to the internet - this is purely for local usage within my private LAN!!
Prerequisites
Of course first we’ll need to download Nextcloud. So follow this link and download Nextcloud’s latest zip package (by the time of writing version 23.0). Don’t forget to verify the downloaded zip file using checksum and/or GPG signature.
Next you need to install some additional packages on your DiskStation. Just head over to your DSM Package Center and install the following:
- MariaDB 10 (set a root password and take a note of it)
- Web Station
- Apache HTTP Server 2.4
- PHP 7.4
- phpMyAdmin
Once installed we need to configure a couple of things…
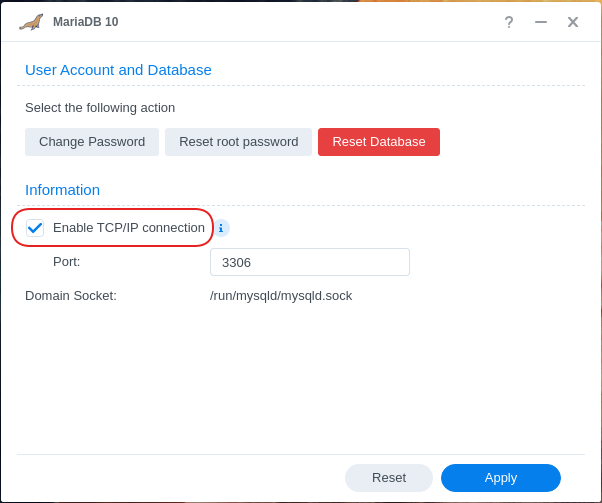
MariaDB
Click on the “MariaDB 10” icon in the app drawer and enable “Enable TCP/IP connections”. You can leave the port as is and hit “Apply”:
Create a database
Now head over to phpMyAdmin. Login as “root” using the password you’ve chosen during installation. We need to create a user and database for Nextcloud and grant all privileges to this user for this one database. Easiest way to do so is to select the “User accounts” tab and click on “Add user account”:
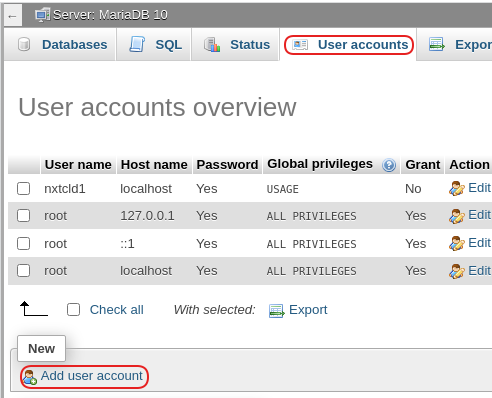
This will open a new window where we need to choose a username and a password. Also set “Hostname” to “local” and check “Create database with same name and grant all privileges”. Once done scroll down and hit “OK” (on lower right corner).

Nextcloud
Now upload the Nextcloud zip file to Apache’s root directory. Open “File Station” and navigate to “web” directory:
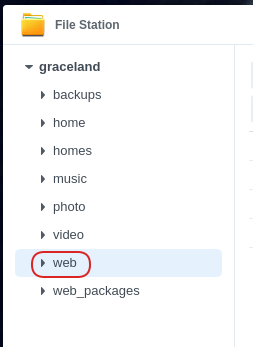
Then click the “Upload” button and upload the downloaded “nextcloud-
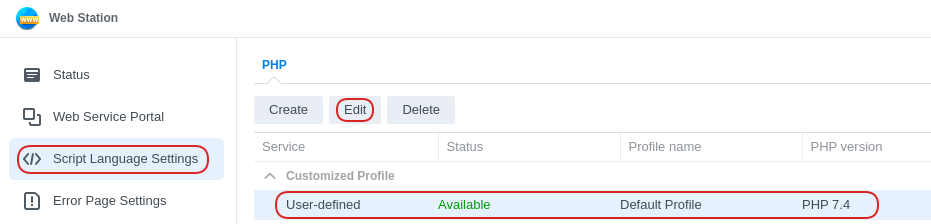
Configure webserver and PHP
Let’s move on to the Apache webserver and PHP configuration. Open “Web Station” and select “Script Language Settings” on the left panel. Now highlight the “Default Profile” and click “Edit”:
You may now edit the default PHP profile. In “Settings” make sure “Enable PHP cache” is checked, leave everything else at its default. Then switch to “Extensions” tab and activate (at least) the following extensions:
- bcmath
- bz2
- calendar
- curl
- dba
- exif
- ftp
- gd
- gettext
- gmp
- iconv
- imagick
- imap
- intl
- mysqli
- openssl
- pdo_mysql
- phar
- posix
- shmob
- soap
- sockets
- sodium
- xmlrpc
- xsl
- zip
- zlib
HINT: you might not need all of them, however I activated those listed above. Of course for security reasons you should not activate more extensions than actually required. As I consider my own network as a secure environment I did not care.
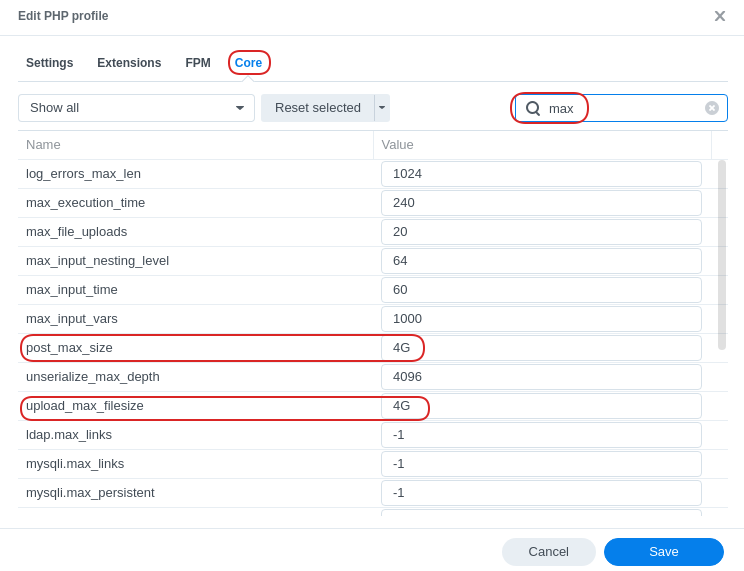
Now select the “Core” tab and in the search box enter “max”. You will now see all parameters with “max” in their name. To be able to upload even large files I changed the values for “post_max_size” and “upload_max_size” to “4G”:
Using the same approach now search for “memory_limit” and set the value to “512M”. Then “Save” everything.
HINT: if you have more than one PHP application running you might want to increase “memory_limit” even a little more and assign each application only a part of it.
Next we’re going to create a dedicated PHP profile for Nextcloud. This new profile will inherit the settings from the “Default profile”. In may case I do not have any other PHP applications installed, so I’ve set the exact same values for the “Nextcloud” profile as I did for the “Default profile” (with one exception, s. below). So click “Create”, again make sure “Enable PHP cache” is checked and repeat the steps above this time for the “Nextcloud” profile.
As mentioned at the beginning, security is not a concern here as this Nextcloud installation is only to be used within a personal network. Nevertheless you might want to put the “data” directory somewhere outside the web server’s root directory. Connect to your Synology DS via SSH (if not enabled go to “Control Panel” -> “Terminal & SNMP” and enable SSH) and create new directory:
1
2
$ sudo mkdir -p /volume1/nextcl-data/nextc-tmp
$ sudo chown -R http:http /volume1/nextcl-data
The “nextcl-tmp” directory will be used as temporary upload directory. In Nextcloud’s PHP profile go to “Core”, search for “sys_temp_dir” and set it to “/volume1/nextcl-data/nexctcl-tmp”.
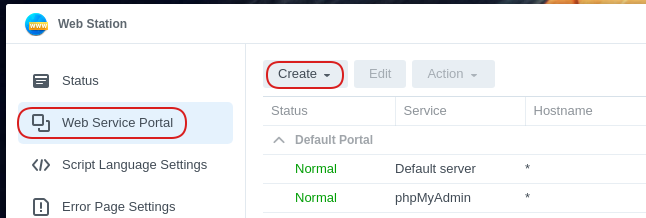
Next we’re creating a new virtual host for the web server. While still in “Web Station” highlight “Web Service Portal”, click “Create” and choose “Create Service Portal” followed by “Virtual Host”:
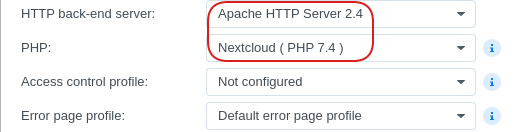
As “Hostname” choose i.e. “nextcloud”, check port “80 / 443” and for “HTTPS settings” “HSTS”. The “Document root” will be the extracted Nextcloud software folder, i.e. “web/nextcloud”. Also make sure “HTTP back-end server” is set to “Apache HTTP Server 2.4” and “PHP” to the just created Nextcloud profile:
Once you hit “Save” a new dialog window will pop up asking if the ownership of this “Document root” should be set to the webserver (“http”): say yes here. However, as Synology will set the permissions via ACLs Nextcloud will still complain a little later. To avoid that simply connect via SSH again and run:
1
$ sudo chown -R http /volume1/web/nextcloud
All preparations should be completed.
Nextcloud setup
Now we’ll actually start the Nextcloud setup by pointing a web browser to the URL of the just prepared Nextcloud installation, i.e.:
1
https://<SYNOLOGY-DS_IP>/nextcloud
Accept the security warning concerning SSL and go on. You will be presented with Nextcloud’s setup page:
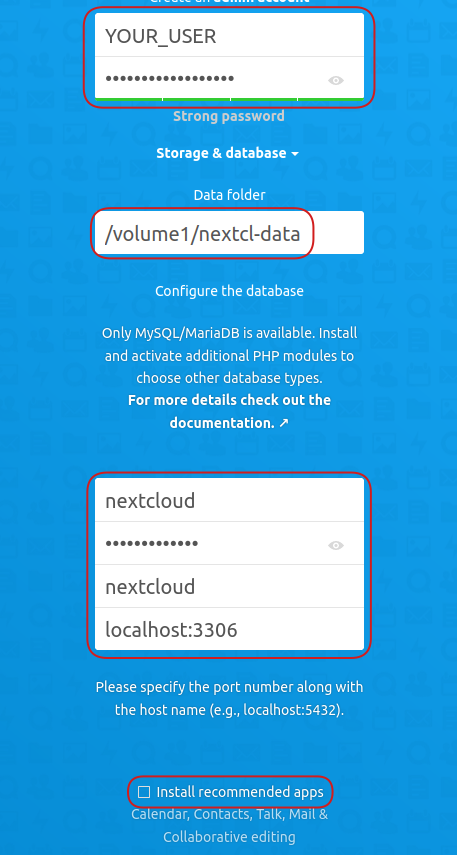
Set the data folder to the one you’ve created before and add DB name/user/password. Add “:3306” as port to “localhost” and I recommend de-selecting “Install recommended apps”. The setup will run into a timeout anyway and this will just prolong the process. Apps can be installed later anyway. Scroll further down and hit “Finish setup”. It will take a while and as just mentioned the setup will likely run into a timeout. No worries: connect to your Synology DS again via SSH and check Nextcloud’s “config” directory (i.e. “/volume1/web/nextcloud/config”) for a file called “CAN_INSTALL”. As soon as this file is not present anymore simply refresh your web browser and you’re good to login!
You might want to add some lines to the Nextcloud configuration file manually, again via command line/SSH connection:
1
$ sudo vi /volume1/web/nextcloud/config/config.php
and add:
1
2
3
4
5
6
array (
  0 => '<SYNOLOGY-DS_IP>',
  1 => '<SYNOLOG-DS_NAME>',
),
'default_phone_region' => '<YOUR-REGION>',
'memcache.local' => '\\OC\\Memcache\\APCu',
Of course replace content of <> accordingly…
Cron job
In Nextcloud’s settings select “Webcron” as backend for background tasks. Then create a custom job via Synology’s “Control Center -> Task Scheduler” of type “User defined script” and add:
1
$ curl http://<SYNOLOGY-DS_IP>/nextcloud/cron.php
as script. Do not use “https://” here as curl will not accept the certificate. I’ve configured the job to run every 20 minutes - which seems fine for me.
Anyway, that should be it! :-)